> ## Documentation Index
> Fetch the complete documentation index at: https://noradocs.solomontsao.com/llms.txt
> Use this file to discover all available pages before exploring further.
# Integrations
# Connect integrations to your agents
> Browse the integration catalog, connect third-party services to your agents, test connections, and manage credentials securely in Nora.
Integrations let your agents interact with external services — from source control and communication tools to cloud infrastructure and databases. When you connect an integration to an agent, Nora encrypts the credentials and injects them as environment variables into the agent's container at deployment time (or on the next sync). The agent runtime can then use those variables to call external APIs without you needing to hard-code any credentials.
## How integrations work
Each integration maps to one or more environment variables. For example, connecting GitHub injects `GITHUB_TOKEN` into the agent environment. Many integrations also accept additional configuration fields — such as an organization name or project key — which are mapped to their own environment variables alongside the primary credential.
Sensitive fields (tokens, passwords, webhook URLs, and similar values) are encrypted with AES-256-GCM before storage. Non-sensitive config values (hostnames, usernames, IDs) are stored as plain text. All sensitive values are redacted in API responses — you will see `[REDACTED]` instead of the raw value after saving.
## Browse the integration catalog
The integration catalog lists all available integrations. You can browse the full catalog or filter by category.
To view the catalog from the dashboard, open the **Integrations** section on an agent's detail page. You can also call the catalog API directly:
```http theme={null} theme={null}
GET /api/integrations/catalog
```
To filter by category:
```http theme={null} theme={null}
GET /api/integrations/catalog?category=developer-tools
```
## Connect an integration to an agent
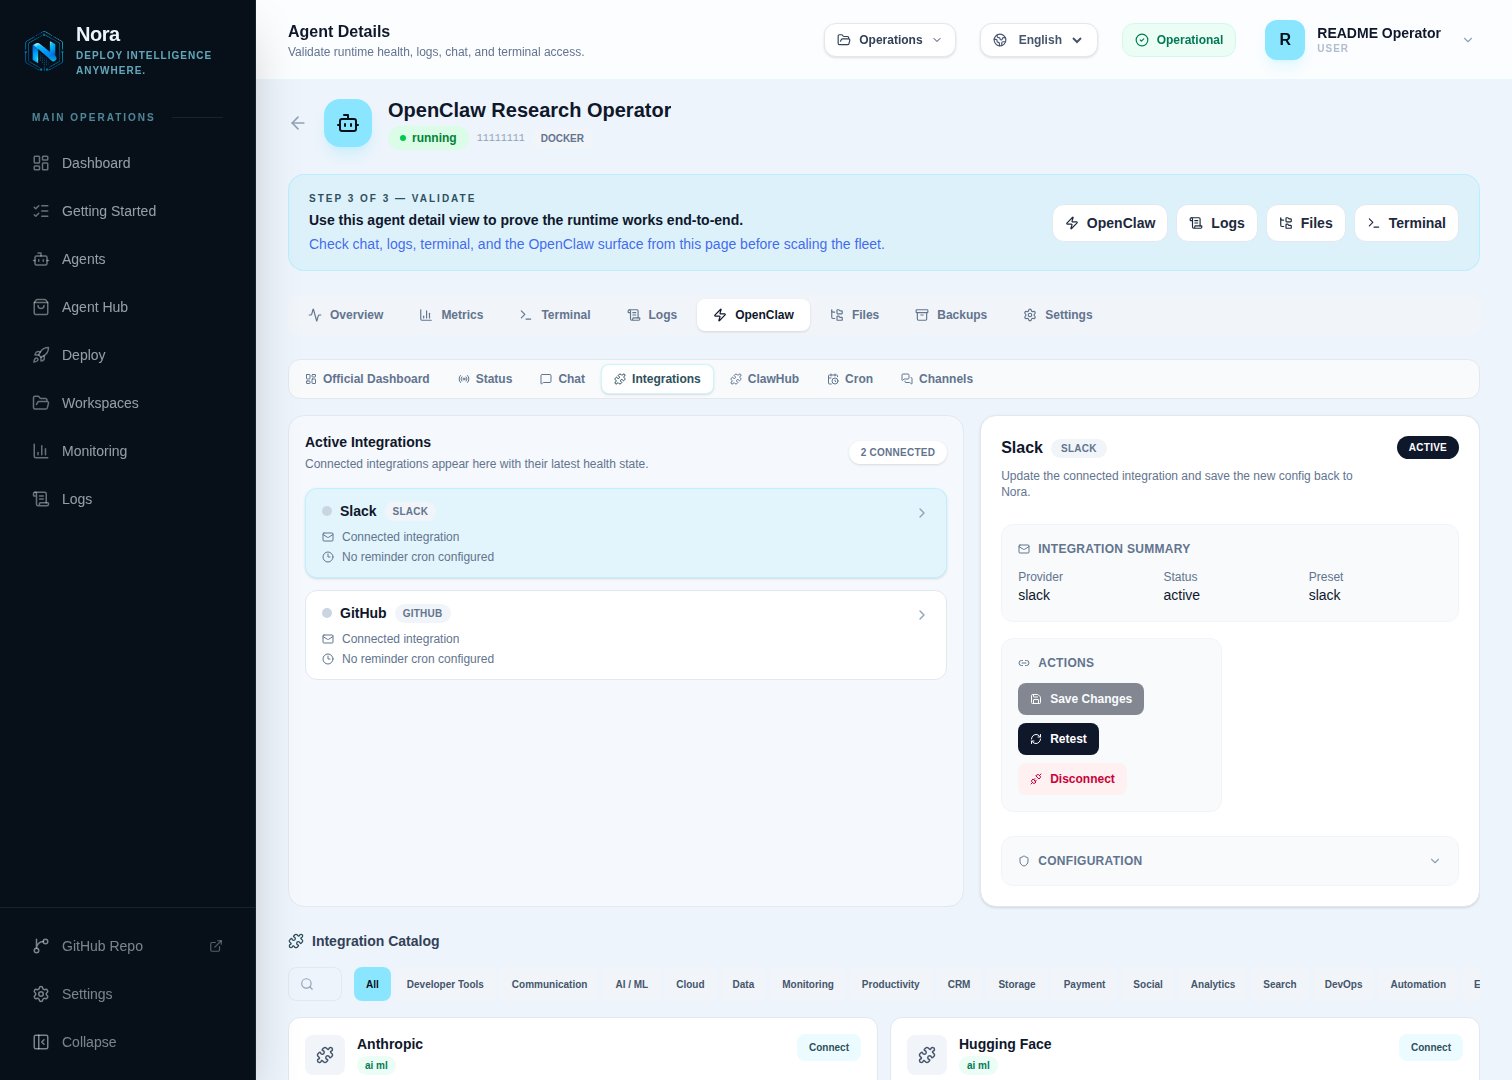 Navigate to the agent's detail page and select the **Integrations** tab.
Find the integration you want in the catalog list. Each entry shows the service name, category,
and a description of what credentials it needs.
Fill in the required fields. The primary credential (such as an API key or token) goes in the main
credential field. Additional config fields (such as a site URL, email address, or organization
name) appear below.
Navigate to the agent's detail page and select the **Integrations** tab.
Find the integration you want in the catalog list. Each entry shows the service name, category,
and a description of what credentials it needs.
Fill in the required fields. The primary credential (such as an API key or token) goes in the main
credential field. Additional config fields (such as a site URL, email address, or organization
name) appear below.
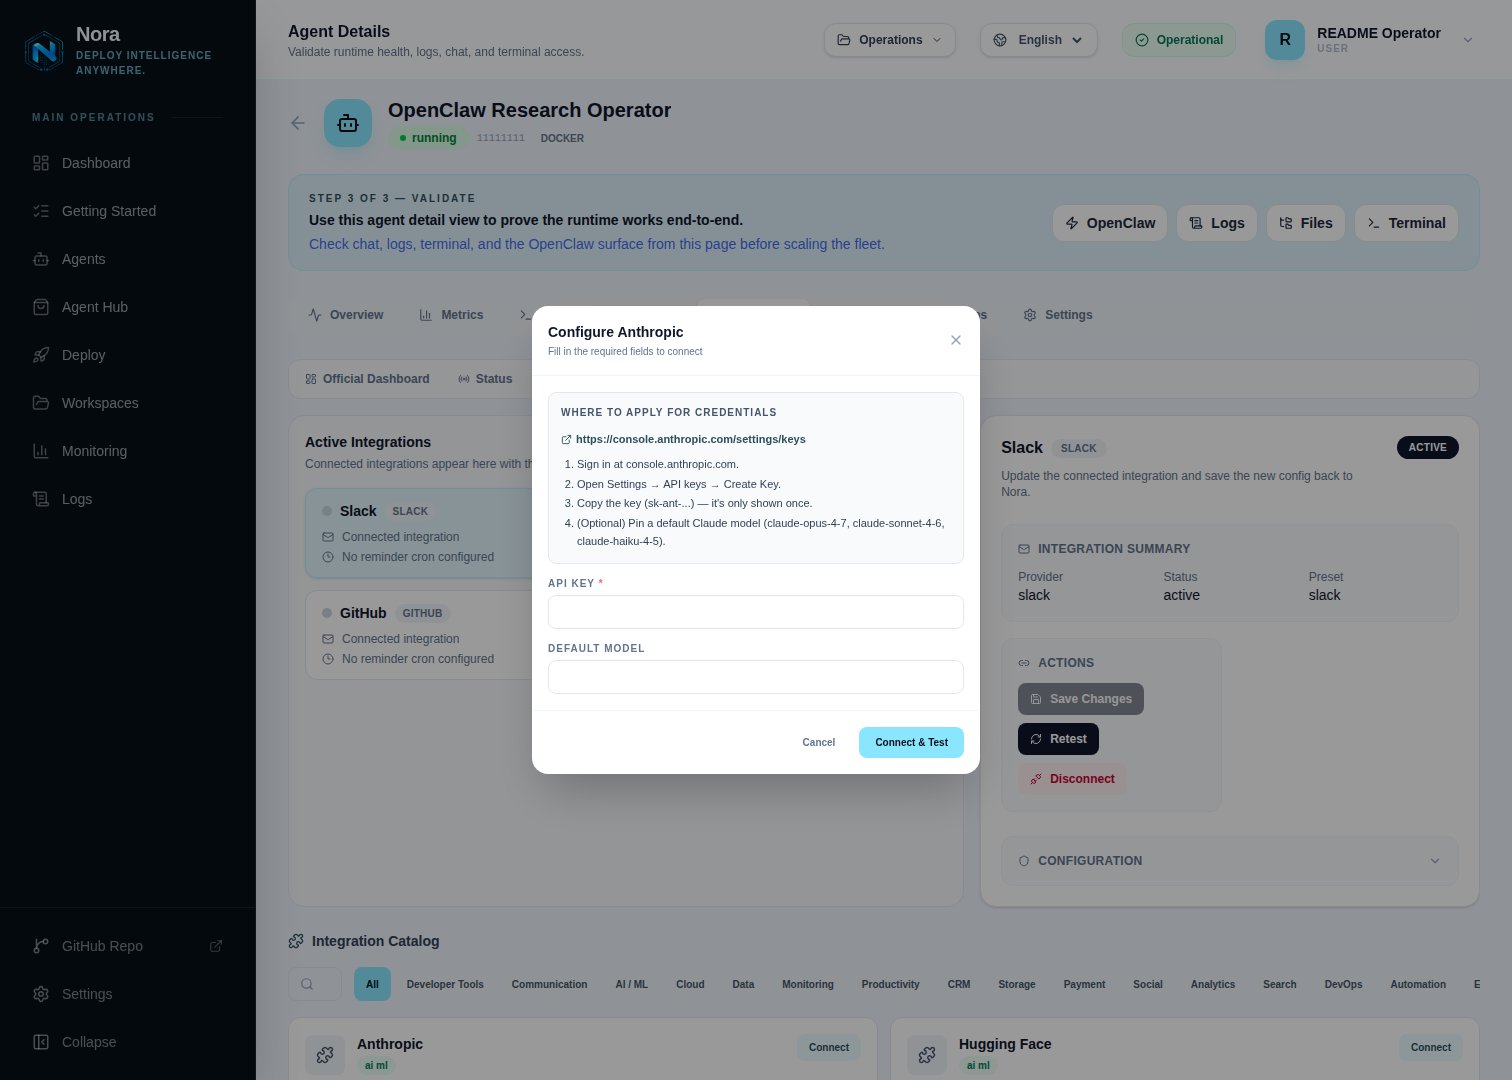 Click **Connect** or **Save**. Nora encrypts the credentials and stores the integration record.
The integration status is set to `active`.
If the agent is already running, use the **Sync** button to push the new integration's environment variables into the container. For agents deployed after the integration was added, the variables are baked in at container creation time.
## OAuth-based integrations
Some providers (currently **Twitter / X** and **LinkedIn**) authorize through an OAuth 2.0 redirect flow rather than asking you to paste a long-lived access token. The dashboard detects these from the catalog's `authType: oauth2` and replaces the **Connect** button with an **Authorize with \** button.
OAuth providers ask for a Client ID and Client Secret instead of an access token — these come from an app you create in the provider's developer console (for example [LinkedIn Developers](https://www.linkedin.com/developers/) or the [X Developer Portal](https://developer.x.com/)).
### Register the redirect URI before authorizing
Every OAuth app must declare an authorized redirect URI. Nora always uses the path `/api/integrations//oauth/callback` on your Nora deployment's public origin. The integration modal shows the exact URL to copy — paste it into the provider's app configuration as an authorized redirect URI **before** clicking **Authorize**.
The pattern is:
```
https:///api/integrations//oauth/callback
```
For example:
| Provider | Redirect URI |
| ----------- | ------------------------------------------------------------------- |
| Twitter / X | `https:///api/integrations/twitter/oauth/callback` |
| LinkedIn | `https:///api/integrations/linkedin/oauth/callback` |
The host is whatever you set in `NEXTAUTH_URL` / `NORA_PUBLIC_URL`. If those aren't set, Nora falls back to the request's `Host` header (so a self-hosted deployment behind nginx works without extra configuration).
### Authorize an account
Use the provider's developer console to create a new OAuth 2.0 application. Copy the redirect URI shown in the Nora integration modal and add it as an authorized redirect URI on the app.
Back in Nora, fill in the Client ID and Client Secret fields. These are stored encrypted alongside
the OAuth tokens.
Nora redirects you to the provider's consent screen. After you approve the requested scopes, the
provider redirects back to Nora's callback URL, which exchanges the authorization code for an
access token and refresh token.
OAuth providers issue access tokens with limited lifetimes (60 minutes for Twitter / X, 60 days for LinkedIn). Nora persists the refresh token and rotates the access token automatically before it expires, so you do not need to re-authorize unless you revoke the app or rotate the Client Secret.
The Client Secret is never sent to agents. The runtime sync payload only includes the rotating
access token plus non-secret config like the connected username — the OAuth app secrets stay on
the Nora control plane.
## Test a connection
After connecting an integration, you can verify the credentials are valid:
1. Open the agent's **Integrations** tab.
2. Find the integration and click **Test**.
Nora calls the provider's API using the stored credentials and reports success or an error message. For example, a GitHub test calls `GET /user` and returns the authenticated username on success.
Not all providers have automated connectivity tests. For providers without a specific test, Nora
confirms that credentials are stored but cannot verify they work against the live API.
## Remove an integration
1. Open the agent's **Integrations** tab.
2. Find the integration you want to remove.
3. Click **Remove** or the trash icon and confirm.
Removing an integration deletes the stored credentials. It does not restart the agent — the environment variables will no longer be injected on the next deployment or sync.
## Expose an integration as an MCP server
Some connected integrations can also run as a [Model Context Protocol](https://modelcontextprotocol.io) (MCP) server inside the agent's OpenClaw runtime, giving the agent that provider's MCP tools directly. The **MCP Servers** panel on the agent's **Integrations** tab lists every supported provider; toggle one on once its integration is connected.
Nora launches each enabled server over stdio with the integration's own credentials — you don't paste anything twice. Supported today: **GitLab, Notion, Stripe, and Supabase**. The set of enabled servers is applied to the runtime on the agent's next **redeploy**, so the panel shows a reminder after a change.
Providers whose MCP server needs file-based credentials (Google Drive, Kubernetes) or a connection string (PostgreSQL) are not yet available in the panel.
## Per-provider guides
Every supported integration has a dedicated page that documents where to apply for the credential, which scopes/permissions to grant, and how to connect it to Nora. The same `credentialsUrl` and `setupGuide` content surfaces inline in the dashboard's integration modal, so docs and dashboard stay in sync.
/guides/integrations/
For the live, authoritative list of supported providers, call `GET /api/integrations/catalog` or open the **Integrations** tab on any agent's detail page.
## Inbound webhooks
Some integrations can also send events into Nora from an external service. Nora exposes a public webhook receiver endpoint for each channel:
```
POST /webhooks/:channelId
```
External services (such as GitHub Actions, Stripe, or PagerDuty) can POST event payloads to this URL. Nora logs the inbound payload and forwards it to the agent runtime if the agent is running.
The inbound webhook endpoint is public and does not require an `Authorization` header. Use a
signing secret or verify token in your integration's config to validate inbound payloads on the
agent side.
Click **Connect** or **Save**. Nora encrypts the credentials and stores the integration record.
The integration status is set to `active`.
If the agent is already running, use the **Sync** button to push the new integration's environment variables into the container. For agents deployed after the integration was added, the variables are baked in at container creation time.
## OAuth-based integrations
Some providers (currently **Twitter / X** and **LinkedIn**) authorize through an OAuth 2.0 redirect flow rather than asking you to paste a long-lived access token. The dashboard detects these from the catalog's `authType: oauth2` and replaces the **Connect** button with an **Authorize with \** button.
OAuth providers ask for a Client ID and Client Secret instead of an access token — these come from an app you create in the provider's developer console (for example [LinkedIn Developers](https://www.linkedin.com/developers/) or the [X Developer Portal](https://developer.x.com/)).
### Register the redirect URI before authorizing
Every OAuth app must declare an authorized redirect URI. Nora always uses the path `/api/integrations//oauth/callback` on your Nora deployment's public origin. The integration modal shows the exact URL to copy — paste it into the provider's app configuration as an authorized redirect URI **before** clicking **Authorize**.
The pattern is:
```
https:///api/integrations//oauth/callback
```
For example:
| Provider | Redirect URI |
| ----------- | ------------------------------------------------------------------- |
| Twitter / X | `https:///api/integrations/twitter/oauth/callback` |
| LinkedIn | `https:///api/integrations/linkedin/oauth/callback` |
The host is whatever you set in `NEXTAUTH_URL` / `NORA_PUBLIC_URL`. If those aren't set, Nora falls back to the request's `Host` header (so a self-hosted deployment behind nginx works without extra configuration).
### Authorize an account
Use the provider's developer console to create a new OAuth 2.0 application. Copy the redirect URI shown in the Nora integration modal and add it as an authorized redirect URI on the app.
Back in Nora, fill in the Client ID and Client Secret fields. These are stored encrypted alongside
the OAuth tokens.
Nora redirects you to the provider's consent screen. After you approve the requested scopes, the
provider redirects back to Nora's callback URL, which exchanges the authorization code for an
access token and refresh token.
OAuth providers issue access tokens with limited lifetimes (60 minutes for Twitter / X, 60 days for LinkedIn). Nora persists the refresh token and rotates the access token automatically before it expires, so you do not need to re-authorize unless you revoke the app or rotate the Client Secret.
The Client Secret is never sent to agents. The runtime sync payload only includes the rotating
access token plus non-secret config like the connected username — the OAuth app secrets stay on
the Nora control plane.
## Test a connection
After connecting an integration, you can verify the credentials are valid:
1. Open the agent's **Integrations** tab.
2. Find the integration and click **Test**.
Nora calls the provider's API using the stored credentials and reports success or an error message. For example, a GitHub test calls `GET /user` and returns the authenticated username on success.
Not all providers have automated connectivity tests. For providers without a specific test, Nora
confirms that credentials are stored but cannot verify they work against the live API.
## Remove an integration
1. Open the agent's **Integrations** tab.
2. Find the integration you want to remove.
3. Click **Remove** or the trash icon and confirm.
Removing an integration deletes the stored credentials. It does not restart the agent — the environment variables will no longer be injected on the next deployment or sync.
## Expose an integration as an MCP server
Some connected integrations can also run as a [Model Context Protocol](https://modelcontextprotocol.io) (MCP) server inside the agent's OpenClaw runtime, giving the agent that provider's MCP tools directly. The **MCP Servers** panel on the agent's **Integrations** tab lists every supported provider; toggle one on once its integration is connected.
Nora launches each enabled server over stdio with the integration's own credentials — you don't paste anything twice. Supported today: **GitLab, Notion, Stripe, and Supabase**. The set of enabled servers is applied to the runtime on the agent's next **redeploy**, so the panel shows a reminder after a change.
Providers whose MCP server needs file-based credentials (Google Drive, Kubernetes) or a connection string (PostgreSQL) are not yet available in the panel.
## Per-provider guides
Every supported integration has a dedicated page that documents where to apply for the credential, which scopes/permissions to grant, and how to connect it to Nora. The same `credentialsUrl` and `setupGuide` content surfaces inline in the dashboard's integration modal, so docs and dashboard stay in sync.
/guides/integrations/
For the live, authoritative list of supported providers, call `GET /api/integrations/catalog` or open the **Integrations** tab on any agent's detail page.
## Inbound webhooks
Some integrations can also send events into Nora from an external service. Nora exposes a public webhook receiver endpoint for each channel:
```
POST /webhooks/:channelId
```
External services (such as GitHub Actions, Stripe, or PagerDuty) can POST event payloads to this URL. Nora logs the inbound payload and forwards it to the agent runtime if the agent is running.
The inbound webhook endpoint is public and does not require an `Authorization` header. Use a
signing secret or verify token in your integration's config to validate inbound payloads on the
agent side.