Self-host Nora on your own infrastructure
Run Nora on your own infrastructure with the one-line installer or Docker Compose. Covers system requirements, install paths, and opening the dashboard.Nora is self-hosted by design. You run the full stack — Nginx, Next.js frontends, Express API, PostgreSQL, and Redis — on infrastructure you control. This page covers system requirements, the two install paths, and how to reach the dashboard once the stack is running.
System requirements
Before you install, make sure your host meets the following requirements.| Requirement | Details |
|---|---|
| Operating system | macOS 12+, Linux (Ubuntu 20.04+, Debian 11+, Fedora 38+), or Windows 10+ with WSL2 |
| Permissions | Admin or sudo access for initial setup |
| Docker | Docker Engine with Compose v2+ (the installer can install Docker if it is missing) |
| Git | Git (the installer can install Git if it is missing) |
| OpenSSL | OpenSSL (used to generate secrets; the installer can install it if missing) |
The setup script checks for Docker, Docker Compose, Git, and OpenSSL and installs any that are
missing before proceeding.
Recommended install
The installer script is the fastest path to a running Nora instance. It handles dependency checks, secret generation, access mode configuration, optional admin account creation, local port selection, and stack startup in one interactive pass.Follow the interactive prompts
The installer walks you through each configuration decision in order:
- Verify or install Docker, Docker Compose, Git, and OpenSSL
- Clone the repository (if running via the curl pipe)
- Generate or preserve secrets for JWTs, AES encryption, managed backups, Agent Hub keys, and the database
- Choose platform mode: self-hosted (operator-defined resource limits) or PaaS (Stripe billing)
- Choose whether to keep the GA Docker backend enabled. Kubernetes clusters are registered after setup in Admin -> Kubernetes. Proxmox is planned but release-blocked in the current release, so setup does not enable it.
- Choose access mode: local only (
http://localhost:8080), public domain behind a proxy, or public domain with TLS at Nginx - Optionally create a bootstrap admin account
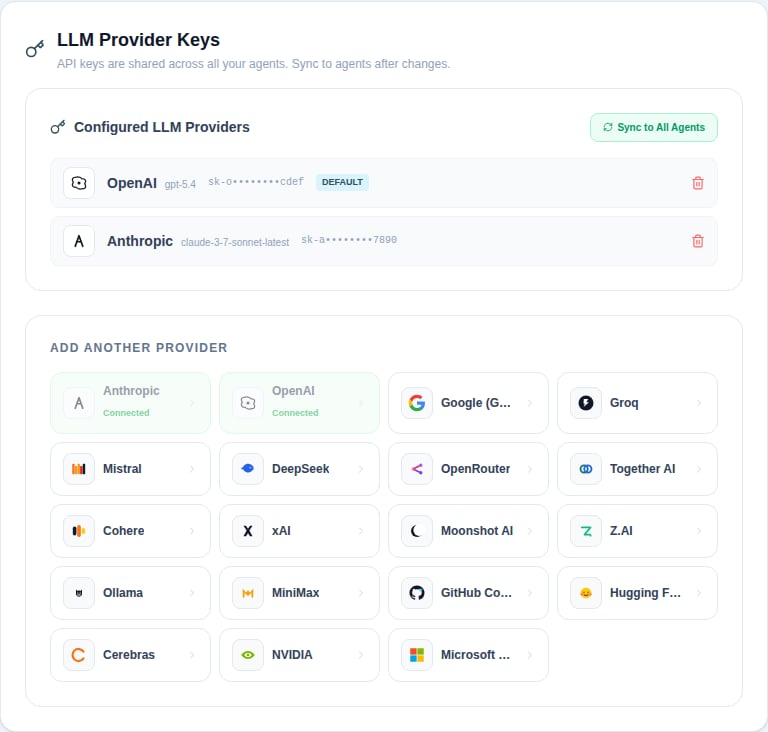
- Start the stack; after login, add your LLM provider key in Settings
.env and starts the stack with docker compose up -d.In local mode, setup checks host ports before startup. If
8080 is busy, it offers a free web port such as 8081 and updates NEXTAUTH_URL. If 127.0.0.1:4100 is busy, it offers a free backend API port and writes BACKEND_API_PORT.Reconfigure vs clean reinstall
If you run setup again from an existing checkout, it asks which maintenance mode you want:| Mode | What it preserves | When to use it |
|---|---|---|
| Update code only | .env, Docker volumes, and provisioned agents | Pull the latest Nora code without changing local configuration |
| Reconfigure install | Docker volumes and provisioned agents | Change limits, access mode, enabled runtimes, or ports while keeping local data |
| Clean reinstall | Nothing local; compose volumes and local Nora agent containers are removed | Start over with a brand-new local database |
Manual setup
Use manual setup when you want full control over every configuration value before the stack starts.Run the setup script from inside the repo
Running If you prefer to configure everything by hand, copy the example environment file instead and edit it directly:
bash setup.sh from inside a cloned repo skips the clone step and takes you through the same interactive configuration flow as the one-line installer.Start the stack
Once Docker Compose pulls and starts all Nora services: the reverse proxy, frontend dashboards, backend API, database, and queue.
.env is configured, start all services in the background:Kubernetes (Helm)
Run Nora itself on a Kubernetes cluster with the official chart ininfra/helm/nora. The chart deploys the full control plane (nginx edge, the three frontends, backend API, provisioner and backup workers) with in-chart PostgreSQL and Redis by default, or external data stores via values.
publicUrl, enable ingress.*, and terminate TLS at your Ingress controller.
See the chart README for all values, design notes, and the local Kind smoke test.
Accessing the dashboard
After installation, the following URLs are available in local mode. Public-domain mode uses the same paths on your configured origin.| URL | What it opens |
|---|---|
http://localhost:8080 | Marketing and entry page |
http://localhost:8080/login | Log in to your operator account |
http://localhost:8080/signup | Create a new operator account |
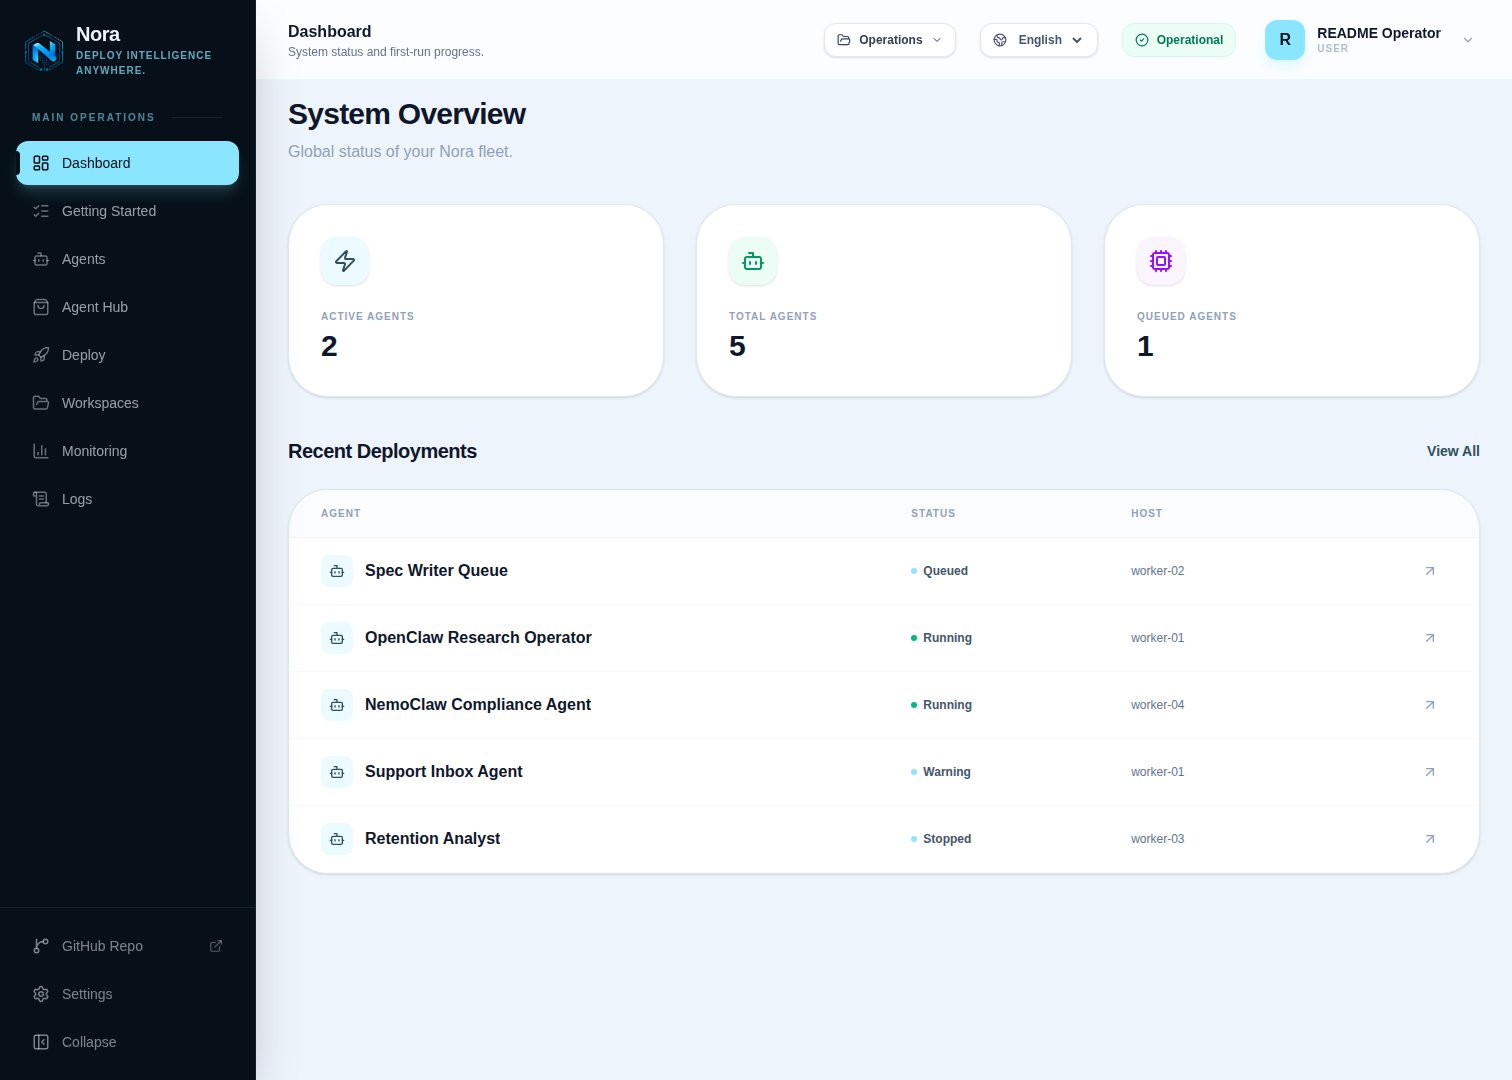
http://localhost:8080/app/dashboard | System overview and agent status |
http://localhost:8080/app/deploy | Deploy your first agent runtime |
What happens next
Once you can reach the dashboard, the next steps are:- Go to Settings and add an LLM provider key (Anthropic, OpenAI, Google, or another supported provider).
- Go to Deploy, name your agent, choose a runtime mode, set resource limits, and click Confirm & Deploy Agent.
- Open the agent detail page to verify it is running, test Chat, inspect Logs, and open Terminal.